Docker
Docker is a set of platform as a service products that use OS-level virtualization to deliver software in packages called containers. The service has both free and premium tiers. The software that hosts the containers is called Docker Engine.
Containerize an application
A container is a sandboxed process running on a host machine that is isolated from all other processes running on that host machine.
Build the app’s image
Create an empty file named Dockerfile
1
touch Dockerfile
Using a text editor or code editor, add the following contents to the Dockerfile:
1
2
3
4
5
6
7

FROM node:18-alpine
WORKDIR /app
COPY . .
RUN yarn install --production
CMD ["node", "src/index.js"]
EXPOSE 3000
Build the image.
1
 docker build -t getting-started .
Start an app container
1
 docker run -dp 127.0.0.1:3000:3000 getting-started
The -d flag (short for --detach) runs the container in the background. This means that Docker starts your container and returns you to the terminal prompt.
The -p flag (short for --publish) creates a port mapping between the host and the container. The -p flag takes a string value in the format of HOST:CONTAINER, where HOST is the address on the host, and CONTAINER is the port on the container.
Update the application
After making changes and trying to rerun the program got this error
1
2
4d023246126bb387185250f548bbe88370898d3658c2e4ea1ae30e56aa73261e
docker: Error response from daemon: driver failed programming external connectivity on endpoint happy_carson (fe1de1701dd01323fc5c19ccff6ef29d6eb524e0a07dc51cb52b56af38fb3a91): Bind for 127.0.0.1:3000 failed: port is already allocated.
Remove the old container
- Get the ID of the container by using the
docker pscommand. - Use the
docker stop <the-container-id>command to stop the container. Replacewith the ID from docker ps. - Once the container has stopped, you can remove it by using the ` docker rm
` command.
Start the updated app container
Now, start your updated app using the docker run command.
Share the application
A Docker ID lets you access Docker Hub, which is the world’s largest library and community for container images. Create a Docker ID for free if you don’t have one .
Now that you’ve built an image, you can share it. To share Docker images, you have to use a Docker registry. The default registry is Docker Hub and is where all of the images you’ve used have come from.
- Create a repository
- Push the image
- Run the image on a new instance
Persist the DB
The container’s filesystem
When a container runs, it uses the various layers from an image for its filesystem. Each container also gets its own “scratch space” to create/update/remove files. Any changes won’t be seen in another container, even if they’re using the same image.
See this in practice
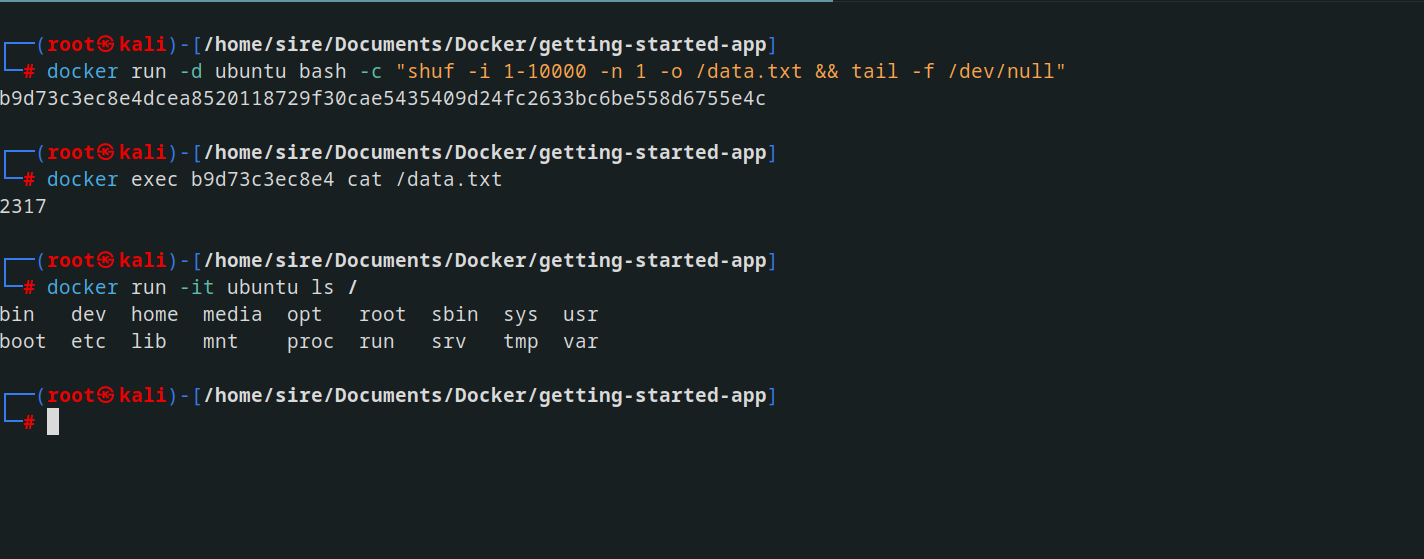
To see this in action, you’re going to start two containers and create a file in each. What you’ll see is that the files created in one container aren’t available in another.
Start an ubuntu container that will create a file named /data.txt with a random number between 1 and 10000.
1
2
docker run -d ubuntu bash -c "shuf -i 1-10000 -n 1 -o /data.txt && tail -f /dev/null"
Validate that you can see the output by accessing the terminal in the container
1
 docker exec <container-id> cat /data.txt
You should see a random number.
Now, start another ubuntu container (the same image) and you’ll see you don’t have the same file.
1
 docker run -it ubuntu ls /
Container volumes
While containers can create, update, and delete files, those changes are lost when you remove the container and Docker isolates all changes to that container. With volumes, you can change all of this.
Volumes provide the ability to connect specific filesystem paths of the container back to the host machine. If you mount a directory in the container, changes in that directory are also seen on the host machine. If you mount that same directory across container restarts, you’d see the same files.
There are two main types of volumes. You’ll eventually use both, but you’ll start with volume mounts.
Persist the todo data
By default, the todo app stores its data in a SQLite database at /etc/todos/todo.db in the container’s filesystem.
By creating a volume and attaching (often called “mounting”) it to the directory where you stored the data, you can persist the data. As your container writes to the todo.db file, it will persist the data to the host in the volume.
Create a volume and start the container
You can create the volume and start the container using the CLI or Docker Desktop’s graphical interface.
- Create a volume by using the
docker volume createcommand.1
docker volume create todo-db - Start the todo app container, but add the
--mountoption to specify a volume mount. Give the volume a name, and mount it to /etc/todosin the container, which captures all files created at the path
1
 docker run -dp 127.0.0.1:3000:3000 --mount type=volume,src=todo-db,target=/etc/todos getting-started
Verify that the data persists
- Once the container starts up, open the app and add a few items to your todo list.
Stop and remove the container for the todo app. Use Docker Desktop or
docker psto get the ID and thendocker rm -f <id>to remove it.Start a new container using the previous steps.
Open the app. You should see your items still in your list.
Go ahead and remove the container when you’re done checking out your list.
- You’ve now learned how to persist data.
Use bind mounts
A bind mount is another type of mount, which lets you share a directory from the host’s filesystem into the container. When working on an application, you can use a bind mount to mount source code into the container.
Trying out bind mounts
- Open a terminal and change directory to the getting-started-app directory.
- Run the following command to start bash in an ubuntu container with a bind mount.
1
docker run -it --mount type=bind,src="$(pwd)",target=/src ubuntu bash
Development containers
Using bind mounts is common for local development setups. With a single docker run command, Docker pulls dependencies and tools.
Multi container apps
Container networking
Remember that containers, by default, run in isolation and don’t know anything about other processes or containers on the same machine. So, how do you allow one container to talk to another? The answer is networking. If you place the two containers on the same network, they can talk to each other.
Start MySQL
There are two ways to put a container on a network:
Assign the network when starting the container. Connect an already running container to a network.
you’ll create the network first and then attach the MySQL container at startup.docker network create todo-app
Start a MySQL container and attach it to the network. You’re also going to define a few environment variables that the database will use to initialize the database
1
2
3
4
5
6
 docker run -d \
    --network todo-app --network-alias mysql \
    -v todo-mysql-data:/var/lib/mysql \
    -e MYSQL_ROOT_PASSWORD=secret \
    -e MYSQL_DATABASE=todos \
    mysql:8.0
To confirm you have the database up and running, connect to the database and verify that it connects.
1
docker exec -it <mysql-container-id> mysql -u root -p
Connect to MySQL
Start a new container using the nicolaka/netshoot image. Make sure to connect it to the same network.
1
docker run -it --network todo-app nicolaka/netshoot
Inside the container, you’re going to use the dig command, which is a useful DNS tool. You’re going to look up the IP address for the hostname mysql. dig mysql
Run your app with MySQL
You can now start your dev-ready container.
Specify each of the previous environment variables, as well as connect the container to your app network. Make sure that you are in the getting-started-app directory when you run this command.
1
2
3
4
5
6
7
8
9
10
docker run -dp 127.0.0.1:3000:3000 \
  -w /app -v "$(pwd):/app" \
  --network todo-app \
  -e MYSQL_HOST=mysql \
  -e MYSQL_USER=root \
  -e MYSQL_PASSWORD=secret \
  -e MYSQL_DB=todos \
  node:18-alpine \
  sh -c "yarn install && yarn run dev"
or run this command if you have the Dockerfile and create an image
1
2
3
4
5
6
7
docker run -dp 127.0.0.1:3000:3000 \
  --network todo-app \
  -e MYSQL_HOST=mysql \
  -e MYSQL_USER=root \
  -e MYSQL_PASSWORD=secret \
  -e MYSQL_DB=todos \
  my-node-app
Connect to the mysql database and prove that the items are being written to the database
1
docker exec -it <mysql-container-id> mysql -p todos``
Use Docker Compose
Docker Compose is a tool that helps you define and share multi-container applications. With Compose, you can create a YAML file to define the services and with a single command, you can spin everything up or tear it all down.